
Jelly has a dowdy reputation, but it may well be the perfect food for the Instagram age: when it works, it’s incredibly photogenic, so who cares what it tastes like?
There can be no other explanation for recent claims that savoury jellies – the most lurid and off-putting of dishes, reminiscent of the worst culinary efforts of the 1950s – are suddenly fashionable. This resurgence comes, according to the New York Times, “at a time when chefs are feeling pressure to produce viral visuals and molecular gastronomy is old hat”.
The notion that jelly is having a moment is actually a perennial threat: this time last year it was reported that supermarket jelly cube sales were rising sharply, while vintage jelly moulds were experiencing a five-fold increase in online sales. And it was 15 years ago that the high-end “jellymongers” Bompas & Parr – known for their elaborate architectural creations – first published their book on the subject.
People who are sceptical about jelly are often put off by its origins. There’s no getting round it: gelatine is a pork byproduct, extracted from the bones, skin and connective tissue of the animal. But these days there are widely available vegan-friendly setting agents – mostly carrageenan and agar, derived from algae – that work just as well.
You can look at colourful, detailed, wobbling jelly creations all day long on Instagram or TikTok, but if you want to experience the jelly renaissance first-hand – savoury or otherwise – you’ve got to make your own. How hard could it possibly be? I decided to find out.
First off, a warning: there is really no such thing as a jelly recipe. You will find instructions everywhere, of course, but they will be of little help in your specific circumstances – the variables are simply too great. Moulds come in all sorts of weird sizes. Suggested setting times, in my brief experience, mean nothing: it’s set when it’s set.
Better to rely on some solid practicalities: fill your jelly mould to the brim with water, and then pour the water into a measuring jug – that’s the total amount of liquid you’re after. To calculate how much gelatine you’ll need, bear in mind that one leaf sets 100ml of liquid.
Confusingly, gelatine leaves come in four grades – bronze, silver, gold and platinum – all with different setting strengths, but you don’t have to worry about that because a) the size of the leaves is adjusted, so they all have the same per-leaf strength and b) you’ll probably only be able to find platinum in the supermarket anyway. But be prepared to adjust the exact proportions according to your needs – every jelly is a compromise between structural integrity and an agreeable wobble. If you just want it to stand up for a photo you can double the amount of gelatine, but the result will have the consistency of an eraser.
Soften the leaves first in cold water – five minutes should do it – and then add them to your liquid, making sure that liquid is hotter than 35C but nowhere near boiling. Once the gelatine is fully dissolved, you can pour the liquid into your mould and leave it in the fridge to set. That’s the basic technique – everything else is guesswork, practice and panic.
Grapefruit jelly
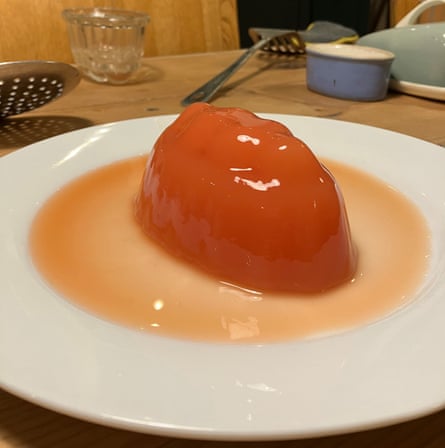
I chose something simple to start with: Nigel Slater’s grapefruit jelly. I simplified his instructions further by replacing the words “halve and squeeze the grapefruits” with “buy some grapefruit juice”. The recipe calls for “six small sheets” of gelatine, which is confounding. They don’t come in sizes! So I fell back on 1 leaf/100ml – plus an extra half-leaf, because the Slater version isn’t for moulding. He just pours his into dessert glasses.
All went well until I tried to release the jelly from the vintage glass mould I bought from eBay. I dipped the mould into warm water for a few seconds – as most recipes direct – but it wasn’t enough. In my impatience, I boiled a kettle, filled a bowl, and lowered the mould into it. Only then did I realise it was too hot to retrieve, and by the time I came up with a strategy – ladling away enough water until I could grab the mould with my fingers – the outermost centimetre of the jelly had melted, leaving me with an ill-defined blob. The jelly itself was lovely though: not too sweet, with a bitter grapefruit note.
I learned a valuable lesson with this one. Onward.
Summer fruit in raspberry jelly

You can make your raspberry jelly from raspberries and sugar, or you can, as I did, just use diluted cordial.
The ring mould I chose for this was enormous. After measuring the total liquid capacity I calculated I would need 19 gelatine sheets – I had to run out and buy more.
The idea is that you fill the mould about three-quarters of the way to the top and let it partially set before pushing the fruits – blueberries, quartered strawberries, raspberries, whatever you’ve got – deep into the jelly. Even after several hours in the fridge, the jelly was insufficiently solid – the fruit kept floating back to the top. Perhaps 19 leaves was a miscalculation. Maybe I should have used 20.
Finally, about six hours in, the first strawberry stayed put. The fruit left an unsightly trail where I jammed it in with my finger, but I persisted until the whole mould was full of suspended fruit. Then I topped it up with more jelly, and left it to set properly. This took days.
In the end I turned my fridge temperature down until ice formed on the back wall. When the time came to turn out the jelly I was not hopeful, but it emerged in perfect condition – the fine detail of the mould was retained and the trails the fruit left had disappeared.
Then, slowly, the whole thing collapsed before my eyes, like a citadel in an earthquake. I put the wreckage in a bowl and ate it with a spoon – delicious.
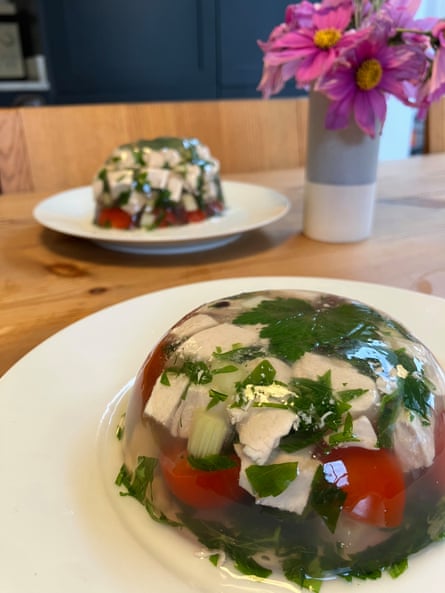
Chicken jelly
The first recorded jellies were savoury. In the 14th century, it took a lot of time, effort and skill to boil animals down to a transparent jelly, but the result would still have tasted too meaty to make a proper dessert. It took the development of industrial extraction processes to produce a clear gelatine with no taste at all.
More often than not, a savoury jelly consists of some meat or veg suspended in a gelled consommé or stock. My jellied chicken salad is a blend of several similar recipes I found online, because I was only ever going to do this once.
You can clarify stock by whisking in egg whites and then straining them, but my broth was pretty transparent after a pass through a sieve lined with muslin, so I didn’t bother.
The “salad” in this case was an arrangement of diced chicken breast, celery, parsley and halved tomatoes – nothing fancy. It set quickly, de-moulded easily and looked weirdly impressive – like leftovers encased in a glass paperweight – but a full 12 hours elapsed before I could summon the will to cut into it with a spoon.
We often use the word “bland” as a synonym for inoffensive, but it turns out some things can be both bland and offensive. Cold chicken stock-flavoured jelly is one of those things. I might have got used to it after several more spoonfuls, but I couldn’t bring myself to try.
Blancmange rabbit
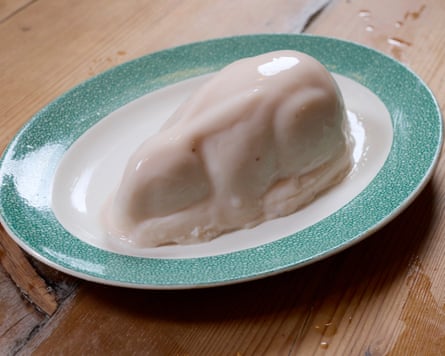
Don’t worry, there’s no rabbit in this one – it just employs a plastic rabbit-shaped mould I bought online. I figured: rabbits are white; why not blancmange?
I’ve never eaten blancmange, or even really known what it was, but I think that what I imagined it to be was probably nicer than jelly made with milk. You’re never too old to be disillusioned.
The recipe I consulted uses cornflour to aid in thickening, along with sugar and lemon peel, but I also borrowed a tip from Bompas & Parr’s book: it takes a long time to dissolve gelatine in milk; it’s easier to dissolve it in a bit of hot water first, and add the liquid to the milk.
I will not share with you all the frustration of trying to release a well-set blancmange from a rabbit-shaped mould – the ears, in particular, really didn’t want to let go – while a photographer looks on. We got there in the end, with a big bowl of hot water and a lot of patience. The best I can say about my rabbit is that I’m pretty certain a small child would have eaten it without complaint. I didn’t have one to hand, and none of the adults in my house would go anywhere near it.
Striped jelly
Variegated jellies are a step up in terms of complication, but all you need is two or more jellies of different colours. I chose cranberry and blancmange, more for the visual contrast than the flavour combination, which I’ll admit in retrospect was jarring and not that pleasant.
Once you’ve prepared your jellies, the strategy is obvious: add layers of alternating colours to the mould, letting them set in between, firmly enough to stay separated, but not so much that the new layer won’t adhere to the one below.
I can’t stress this enough: ignore whatever any recipe tells you in terms of timing, judge the setting by eye, and be prepared to stay up all night. Your room temperature jelly mixture may coagulate while you’re waiting to add more, but a little gentle heat will liquify it again.
I would describe my striped tower as a qualified success – intact but a little lopsided. The main problem was that, instead of a jelly mould, I used an enamelled vase from Ikea. The cylindrical base created an airlock during de-moulding, which in turn created a lot of pent-up anger in me, and I got a bit violent with it. I’m not proud of myself.
The G&T jelly

I took this recipe from the Adventures in Jelly website. It sounded sophisticated, looked easy enough and would allegedly give off an eerie glow under UV light. The ingredients, apart from the gelatine and sugar, are the same as the drink: gin, tonic, lemon.
For this one, I decided to use the only jelly mould I already owned, which is old, ceramic and full of hairline cracks I thought might cause difficulty. I’m not even sure where it came from; I’ve certainly never made jelly in it.
Much to my surprise, this turned out beautifully, with just the right amount of wobble. And it really did taste like a solidified gin and tonic. I took it along to a dinner party (my advice for transporting jellies over distances is: do not) and everyone took pictures of it. Then they ate the entire thing.
Honestly, I was still getting texts about it the next day.


